














String spacing is the measured distance between strings on a guitar, most commonly reported as the span from the outer edge of the first string to the outer edge of the sixth string at the nut or bridge. Get it right and the instrument feels natural under the player’s hand; get it wrong and even a perfectly fretted neck will fight the player on every chord.
Key Takeaways
String spacing is a measurable, adjustable design choice that directly affects playability, pickup alignment, and the overall feel of a finished instrument. Choosing and verifying it before cutting is always faster than correcting it after.
| Point | Details |
|---|---|
| Definition and location | String spacing measures the distance between strings at the nut and bridge; both points matter for playability. |
| Equal vs. proportional | Equal spacing is faster to lay out; proportional spacing produces even gaps and a more consistent feel. |
| Typical ranges | Nut spacing commonly runs 34–46 mm and bridge spacing 52–68 mm, depending on instrument type. |
| Measurement method | Use digital calipers on a strung instrument; verify both outer span and per-string intervals. |
| Pickup alignment check | After any spacing change, measure over the pole pieces to confirm output balance across all strings. |
Table of Contents
- What is string spacing and where do luthiers measure it?
- Equal vs. proportional spacing: which layout should you use?
- Typical string spacing numbers for common instruments
- How to measure string spacing accurately
- How string spacing affects playability, pickup alignment, and setup
- How to set or change string spacing during a build or retrofit
- Common measurement mistakes and how to avoid them
- A luthier’s perspective on spacing defaults and when to customize
- Sources
What is string spacing and where do luthiers measure it?
String spacing has two measurement points that matter most: the nut and the bridge saddle. A third check, over the pickup plane, tells you whether your pole pieces will balance output across all six strings.
Common measurement locations:
- Nut: Measured from the center of the first string slot to the center of the sixth string slot, or edge-to-edge depending on your layout method. This controls left-hand feel and fret access.
- Bridge/saddle: Measured across the saddle contact points. This is the number most players feel directly under their picking hand.
- Pickup plane: Measured over the pole pieces in the strung position. Not a layout point, but a critical alignment check. Lindy Fralin Pickups explains that measuring over the pickup plane with strings installed gives the most accurate picture of how the finished instrument will perform.
Two conventions govern how builders record these distances. Center-to-center measures from the middle of one string to the middle of the next. Edge-to-edge measures the gap between string surfaces. Both are valid; the confusion comes when builders mix them without noting which they used.
Measuring with strings installed is always more reliable than a dry layout. Strings settle into slots and saddles at slightly different positions than a bare template predicts.
Pro Tip: When string centers are hard to locate visually, measure saddle edges or screw-head edges instead. This shortcut gives you the same center-to-center distance as long as your saddles or screws are uniform. If they are not uniform, the shortcut will mislead you, so cross-check with calipers before committing.
Equal vs. proportional spacing: which layout should you use?
These are the two dominant layout philosophies, and the choice shapes both the look and the feel of a finished instrument.
Equal (center-to-center) spacing places string centers at identical intervals across the nut or bridge. It is fast to lay out and easy to verify with a ruler. The catch: because wound strings are physically thicker than plain strings, the gaps between string surfaces are uneven. The gap between the wound G and D looks noticeably wider than the gap between the plain B and high E. As Project Guitar details, equal spacing is quicker to execute but produces those uneven visual and tactile gaps.
Proportional (edge-to-edge) spacing accounts for each string’s diameter so the gaps between string surfaces are equal. The string centers are not evenly spaced, but the playing feel is more consistent. Proportional spacing produces even gaps and a refined feel that many builders and fingerstyle players prefer.
| Feature | Equal (center-to-center) | Proportional (edge-to-edge) |
|---|---|---|
| Layout speed | Fast | Requires string diameter data |
| Visual gaps | Uneven | Even |
| Tactile feel | Slightly irregular | Consistent |
| Best for | Production builds, quick setups | High-end builds, fingerstyle players |
| Vintage accuracy | Common on production instruments | Common on classical and high-end acoustics |
A third option worth knowing: some builders use progressive or tapered spacing, increasing the gap incrementally from treble to bass. This is a deliberate ergonomic choice, not a compromise, and it suits players who need more room on the bass side for aggressive right-hand technique.
Pro Tip: For a new high-end build, always default to proportional spacing. The extra layout time is measured in minutes; the improvement in feel is something a player notices every time they pick up the instrument.
Typical string spacing numbers for common instruments
Published spacing measurements cluster in recognizable ranges, though exact figures vary by maker, era, and individual setup. Nut spacing commonly clusters around the mid-30 millimeter range; bridge spacing is often around the low-50 millimeter range. Nut width alone does not determine perceived spacing at the fretboard. The bridge spacing and the taper philosophy the builder uses determine actual playing room.
| Instrument type | Typical nut spacing | Typical bridge spacing |
|---|---|---|
| Solid-body electric (standard) | approximately in the mid-30 millimeter range | approximately in the low-50 millimeter range |
| Hollowbody / jazz electric | slightly wider nut spacing than solid-body electrics | somewhat wider bridge spacing than solid-body electrics |
| Classical / nylon string | wider nut spacing typical of classical guitars | wider bridge spacing typical of classical guitars |
| Steel-string acoustic | moderate nut spacing comparable to electric guitars | bridge spacing slightly wider than electric guitars |
| 4-string bass | wider nut spacing typical of basses | wider bridge spacing typical of basses |
A few important caveats:
- Finish sanding removes material from nut slots and can shift spacing by 0.5–1 mm if you are not careful.
- Saddle taper on compensated saddles means the contact point shifts slightly from the saddle’s geometric center.
- Player preference is a legitimate variable. Some players with wide hands want more room; some with smaller hands want strings closer together.
Always treat these numbers as starting points, not absolutes. Confirm with calipers on the actual hardware before cutting.
How to measure string spacing accurately
Tools you need:
- Digital calipers (0.01 mm resolution)
- A metric ruler with clear 0.5 mm graduations
- A spacing gauge or nut-slotting template
- Feeler gauges (for checking slot depth, not spacing directly)
Step-by-step measurement procedure:
- String the instrument to pitch and let it settle for at least 15 minutes.
- Place the caliper jaw at the center of the first string (or its edge, noting which convention you use).
- Measure to the center (or edge) of the sixth string. Record this as your outer span.
- For per-string intervals, divide the outer span by five (for a six-string) to get equal center-to-center spacing. For proportional spacing, subtract half the diameter of each adjacent string pair from the equal interval to find each string’s center position.
- Cross-check by measuring each adjacent pair independently. The sum of five adjacent measurements should equal your outer span within 0.2 mm.
- Verify over the pickup plane with strings installed, as described in the pickup alignment check above.
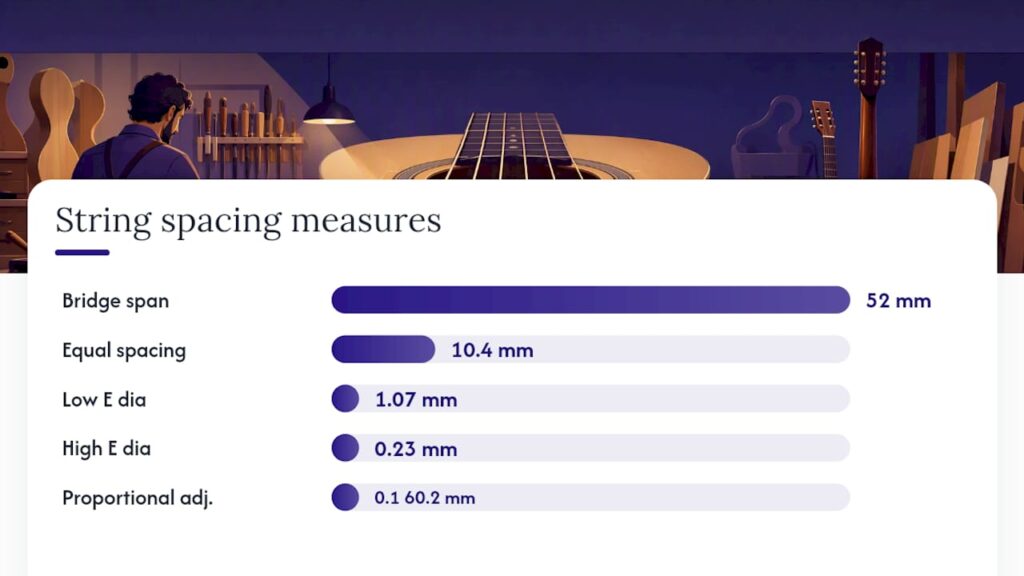
Example calculation: If your target bridge span is 52 mm across six strings, equal center-to-center spacing places each string 10.4 mm apart (52 ÷ 5). For proportional spacing, you subtract half the diameter difference between adjacent strings from each interval. A plain .009" high E (0.23 mm) and a wound .042" low E (1.07 mm) require adjusting each interval by roughly 0.1–0.2 mm to equalize the gaps.
Pro Tip: Keep a dedicated spec sheet for each instrument family you build. Recording nut span, bridge span, and which convention you used means you can replicate a setup exactly, or hand the spec to a client who wants a matching second instrument.
How string spacing affects playability, pickup alignment, and setup
Spacing directly shapes how a player’s picking hand moves across strings. Wider spacing gives fingerstyle players more room to plant and pluck cleanly. Tighter spacing suits fast flatpicking and players with smaller hands. Neither is universally better. The right choice depends on the player’s technique and hand size, which is why guitar playability is always an interaction between instrument geometry and the person holding it.
Playability and technique effects:
- Wide spacing reduces accidental string muting during complex fingerpicking patterns.
- Narrow spacing shortens the lateral reach for chord stretches and can reduce fatigue during long sessions.
- Inconsistent spacing (uneven gaps) causes players to adjust their picking angle string by string, which adds cognitive load and slows technique development.
Pickup alignment is the other critical consequence. Pole pieces are fixed. If your strings sit off-center relative to the poles, output balance suffers. Check alignment by measuring from the outer pole pieces to the outer strings. A small offset of 1–2 mm is usually tolerable; larger offsets produce a noticeably weaker or brighter tone on the affected string.
Pro Tip: Check both the neck and bridge pickup alignment separately. Bridge spacing is almost always wider than nut spacing, so a pickup that aligns perfectly at the neck position may show a larger offset at the bridge, or vice versa.
How to set or change string spacing during a build or retrofit
Your options depend on where you are in the build and how permanent a change you need.
At the nut:
- Recut slots to new positions (permanent; requires a new nut blank if you go wider).
- Replace the nut entirely with a pre-slotted blank at the target spacing.
- Shim a slot that is too wide by filling with bone dust and CA glue, then re-slotting.
At the bridge:
- File or reposition saddles on a tune-o-matic or similar adjustable bridge.
- Replace individual saddles with compensated versions that shift the contact point.
- Swap the entire bridge for one with a different string spread (the most reliable fix on a new build).
For a new build vs. a retrofit: On a new build, set bridge spacing before routing pickup cavities. Changing bridge spacing after routing can put strings off-center over the pickup. On a retrofit or restoration project, always check whether a new bridge footprint covers the existing screw holes before ordering hardware.
Pro Tip: On a vintage instrument, resist the urge to “correct” spacing to modern standards. Historically accurate spacing is part of what collectors value. Confirm the original spec before touching anything.
Common measurement mistakes and how to avoid them
Frequent errors:
- Guessing string centerlines by eye instead of measuring. Even experienced builders misjudge by 0.5–1 mm this way.
- Measuring screw-head spacing and calling it string spacing. Screw-head centers and string centers are not the same unless the saddles are perfectly centered on their screws.
- Mixing center-to-center and edge-to-edge measurements in the same layout. This produces a systematic error that compounds across all six strings.
- Measuring on a dry (unstrung) instrument and assuming the numbers transfer directly to a strung setup.
Quick checks before finalizing:
- String the instrument, then slide a ruler under the strings at the bridge and nut to confirm actual positions.
- Hold a straightedge across the pole pieces and check visually that each string sits directly above a pole.
- Run calipers across each adjacent pair to confirm your intervals are consistent, not just your outer span.
Pro Tip: Build a simple spacing template from a strip of aluminum or acrylic for each instrument family you work on regularly. Mark the string centerlines directly on the template. It takes 20 minutes to make and eliminates measurement errors on every subsequent build.
A luthier’s perspective on spacing defaults and when to customize
For most builds, center-to-center spacing at established industry norms is a defensible default. It is fast, it matches the hardware most players already own, and it meets the expectations of players coming from production instruments. The vintage guitar aesthetic often demands period-accurate spacing, and deviating from it can affect both playability and collector value.
Proportional spacing is worth offering as a deliberate upgrade on high-end commissions, fingerstyle-specific builds, and any instrument where the client is paying for a refined playing experience. The layout takes longer, but the result is a guitar that feels more consistent under the hand, and that difference is something a discerning player will notice and remember.
The one thing to avoid is treating spacing as an afterthought. It is a design decision, and like scale length or neck profile, it should be chosen before the first cut, not corrected after the fact.
Sources
These references are worth bookmarking for calculators, detailed photos, and community measurement discussions:
- How To Get Perfect Guitar String Spacing (Tools & Technique)
- Equal vs. Proportional String Spacing – Instrument Building
- The easiest way to measure string and saddle spacing! | Fender Stratocaster Guitar Forum
- String Spacing for Guitar: How Do You Check It? – Lindy Fralin Pickups
- How string spacing changes the way an electric guitar plays | Guitar World