














For most vintage classical guitars, the safest starting point is a low or normal tension nylon or fluorocarbon treble paired with conservatively tensioned wound basses. Avoid jumping into a high-tension set, no matter how good the reviews sound. Old tops and bridges were never built for extra pull, and a partial change, basses only, is often the smarter first move.
TL;DR:
- Most vintage classical guitars are best restring with low or normal tension nylon or fluorocarbon strings to avoid stressing aging tops and bridges.
- Inspect for signs of structural issues such as bridge lift, seam gaps, or loose glue before increasing string tension to prevent damage.
- Use gentle, one-at-a-time string removal and gradual tuning, paying close attention to tension-related signs of stress during restringing.
- Modern nylon or fluorocarbon strings are often recommended over gut because they better resist humidity swings and hold tuning on older instruments.
- The guitar’s maker, age, and construction style influence suitable string tension, making physical inspection crucial for safe string choice.
Table of Contents
- Why Saitenwahl Klassische Vintage Choices Depend on Structural Risk
- What Tools and String Types Work Best for Vintage Guitars
- How Do You Restring a Vintage Classical Guitar Safely?
- How Often Should You Change Strings on a Vintage Guitar?
- When Should a Luthier Inspect Your Guitar First?
- A Short History of Strings on Classical Vintage Guitars
- Do Different Vintage Guitar Makers Need Different Strings?
- What Vintage Owners Get Wrong About String Choice
- Sources
Why Saitenwahl Klassische Vintage Choices Depend on Structural Risk
Getting the saitenwahl klassische vintage question right starts with understanding what makes an old classical guitar fragile in the first place. These instruments were built decades ago with animal hide glue, thin tops, and no truss rod to correct problems if something shifts. A modern high-tension set can pull significantly harder on the bridge and top than what the guitar wore when it left the workshop, and that difference adds up over months, not days.
Common vulnerabilities on vintage instruments include:
- Weak or aged bridge glue that has already lost some bonding strength over decades
- Open or hairline seams along the sides or back that widen under added stress
- Thin, lightly braced tops designed for gut or early nylon tension, not modern high-tension strings
- No truss rod, meaning any neck relief change is permanent until a luthier intervenes
Higher tension increases the constant pull on the bridge, which raises the risk of bridge lift or gradual seam separation, especially on guitars that have not been restrung in years. If you notice a rising bridge, a buzzing that wasn’t there before, or any visible gap at a seam, stop and get the guitar inspected before you touch the strings again. Replacing only the bass strings, a strategy plenty of experienced players already use, is a genuinely lower-risk way to refresh tone without adding new stress across the whole top.
Pro Tip: If you’re not sure whether your guitar’s bridge is sound, press down gently along its edges while the guitar is at pitch. Any flex or lifting you can feel with light pressure is a sign to call a luthier before restringing.
What Tools and String Types Work Best for Vintage Guitars
A basic string change needs more than a winder and a pair of pliers when the guitar is decades old. Keep a soft cloth on hand to protect the finish, a string winder to speed up tuning peg rotation, small wire cutters for trimming excess string, and a bit of graphite or soft pencil lead for a sticky nut slot. A tuner, either clip on or a simple app, matters more here than on a new guitar because getting to pitch gradually avoids sudden bridge stress.
On material, you have three real choices. Clear nylon is the traditional option, warm and mellow, but it settles slowly and needs more retuning early on. Rectified nylon is ground to a more precise, uniform diameter, giving cleaner intonation. Fluorocarbon is denser and brighter, and some luthiers prefer it because it smooths the tonal transition from treble to bass strings, which matters on guitars where that balance already feels uneven.
Wound basses wrap silver-plated copper or similar metal around a nylon, silk, or composite core, and the wrap material shapes both weight and warmth. On tension: choosing a lower-tension set reduces the constant load on an aging bridge and top, which is exactly why low or normal tension is the sensible default for most vintage instruments rather than high tension, which is really built for modern, heavily braced concert guitars.

Players have access to various guitar string brands such as Savarez, Knobloch, Augustine, D’Addario, Hannabach, Pyramid, and La Bella. La Bella’s Pure Vintage line is specifically marketed toward players chasing an older, historically inspired tone, though availability varies by retailer. For a deeper look at how nylon and fluorocarbon behave differently on old instruments, our guide on nylon versus carbon strings breaks down the trade-offs in more detail.
How Do You Restring a Vintage Classical Guitar Safely?
Restringing a vintage classical is not a race. Rushing the process is the single most common way players introduce avoidable stress into an old top.
-
Prepare your space. Work on a padded surface, ideally with the guitar resting on a soft cloth or a proper support, and check the room’s humidity if you have a hygrometer. Extremes in either direction make old wood more brittle and less forgiving.
-
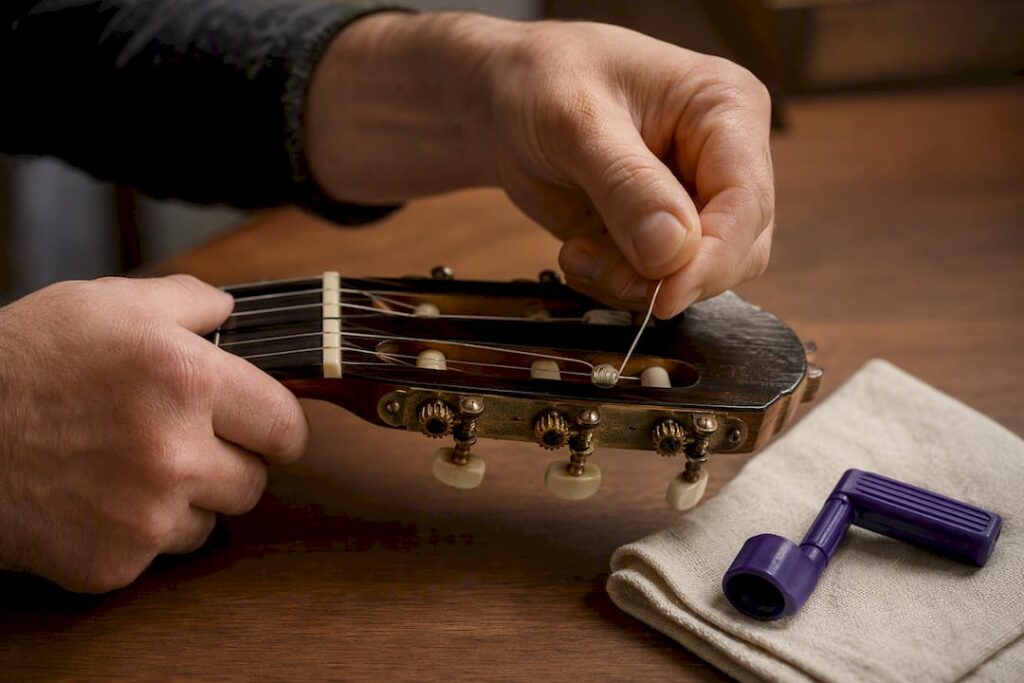
Remove strings one at a time, not all six at once. Pulling every string off simultaneously drops tension on the top all at once, and while that sounds harmless, the sudden release can shift a bridge that was already barely holding on. Loosen, then cut with wire cutters near the bridge to avoid yanking on the tie block.
-
Clean as you go. With each string off, wipe down the fretboard section underneath and check for any lifting at the bridge or new gaps at the seams before moving to the next string.
-
Tie the new string at the bridge using a secure double loop through the tie block, keeping the knot low and tight against the saddle rather than piled up. A loose or sloppy tie will slip under tension and throw off your careful stringing.
-
Wind at the tuner cleanly, leaving two to three wraps around the post for trebles and slightly fewer for basses, keeping the string tracking straight so it doesn’t bind in the nut slot.
-
Bring each string up to pitch gradually, not directly to target. Get it roughly in the ballpark, move to the next string, and circle back.
-
Stretch gently by hand once all six strings are on, pulling each string slightly away from the fretboard and retuning after. New nylon strings settle more slowly than steel strings and need repeated tuning in the first several days, so expect this stretching step to take patience, not one aggressive session.
-
Check the bridge and seams again after the full set is at pitch, and once more the next day. Any new movement at this stage is your cue to ease off and call a luthier rather than push forward.
For a full walkthrough with photos, our step-by-step string change instructions cover the same routine in more visual detail.
Pro Tip: Change one string at a time even if you’re replacing the whole set. Keeping five strings under tension while you work on the sixth stabilizes the neck and bridge far better than removing everything first.
How Often Should You Change Strings on a Vintage Guitar?
New strings need attention almost daily at first, then far less as they settle. Expect to retune several times within the first 24 to 72 hours, since fresh nylon and fluorocarbon stretch noticeably before they hold pitch. After the first week, a quick weekly check is usually enough unless the guitar sees big humidity swings.
On longevity, treble strings and basses do not wear evenly. Wound basses tend to go dull and lose intonation well before the trebles do, which is why many experienced players stage the process, replacing basses on their own schedule and leaving trebles in place for weeks or months longer. This staged approach also happens to be gentler on the instrument, since you are never asking the top to absorb a full six-string tension shift at once.
Watch for these signs that a full set change is overdue:
- Basses sound noticeably dull or muddy compared to when they were fresh
- Intonation drifts noticeably up the neck, especially past the seventh fret
- Trebles develop a rough or grooved feel under your fingertips
- The set has been on for six months or more with heavy regular playing
To protect the fretboard and top during any change, keep a soft cloth nearby to catch oils and dust, and avoid resting metal tools directly on the finish. Our guide on improving a classical guitar’s acoustic setup covers a few adjacent maintenance habits worth pairing with your string routine.
When Should a Luthier Inspect Your Guitar First?
A handful of red flags should stop you before you touch the strings: a bridge that lifts even slightly under light finger pressure, visible daylight at a top or side seam, a sudden buzz that appeared after the last tuning, or a neck that feels like it has shifted relief. None of these are things to work around with a lighter string set. They need eyes on the actual joint.
Tonal authenticity and structural safety are treated as two goals that have to be balanced together, not one traded for the other. A structural check that includes a bridge-pull inspection and a look at glue-line visibility along the seams will catch most of the issues that turn a routine string change into an expensive repair. If glue separation shows up at the bridge, that joint needs professional regluing before any tension increase, full stop.
If you’re weighing whether an instrument is worth this level of care, our testing appointments walk through exactly this kind of hands-on evaluation, and our valuation and certification services give you a documented read on where the guitar stands before you commit to any changes.
A Short History of Strings on Classical Vintage Guitars
The guitar you’re restringing today would have originally worn gut strings, the material used for centuries before anything else existed. Gut worked, but it was inconsistent, expensive, and miserable in humidity, stretching and going false within weeks on some instruments.
That changed after World War II. Commercial nylon string production began in 1948, largely through Albert Augustine’s work and a public endorsement from Andrés Segovia that gave the new material instant credibility among serious players. Within a decade, gut had mostly disappeared from working musicians’ cases, replaced by a material that held pitch better, cost less, and shrugged off humidity in a way gut never could.
That history matters for anyone restringing an old guitar today, because it explains a tension mismatch you’ll run into constantly. Many vintage classical guitars were built and voiced during the gut and early nylon era, when typical tensions ran lower than some of today’s popular sets. Fluorocarbon, a newer development still, adds another wrinkle: it wasn’t part of that original design conversation at all.
The practical takeaway is that players and luthiers regularly trade a small amount of historical purity for stability, choosing modern nylon or fluorocarbon over gut replicas because the modern materials survive humidity swings and hold tuning far better on instruments already decades into their working life.
Do Different Vintage Guitar Makers Need Different Strings?
Not every vintage classical guitar was built to the same standard, and that matters more for string choice than most players assume. A guitar built by a small workshop in the 1960s with lighter fan bracing is going to respond very differently to a high-tension set than a heavier, more robustly built instrument from a larger maker of the same era. There is no universal answer that fits every label or shop stamp.
Spanish-tradition builders from the mid-twentieth century often used lighter bracing patterns intended for the lower tensions common at the time, which is one reason low or normal tension tends to suit these guitars best today. German and other European workshops sometimes built with slightly heavier tops, giving a bit more headroom for normal tension sets without the same bridge-lift risk. Factory-built instruments from the same period, meanwhile, vary enormously depending on the production line and year, so age alone tells you less than a physical inspection does.
The honest answer is that maker and model give you a starting hypothesis, not a rule. A 1965 guitar from one workshop might tolerate a normal-tension set comfortably, while a guitar from the same decade and a different maker shows bridge stress at the same tension. This is exactly why a physical check, not a spec sheet or a forum post about “what that brand usually takes,” should guide your final decision. If you’re trying to place a specific instrument in context before deciding on strings, our overview of vintage guitar types, history, and value is a reasonable starting point for understanding where a given maker or era sits.
What Vintage Owners Get Wrong About String Choice
The conventional advice you’ll find in most string buying guides treats tension as a tone decision first and a structural decision second. That ordering is backwards for anything built before the 1980s. Tone is real and it matters, but it is the second question, not the first. The first question is always whether the instrument in front of you can safely absorb the tension you’re about to put on it.
Where most guides fall short is treating “low tension” as a compromise players settle for rather than the smarter default it usually is on an aging top. A properly built low or normal tension set on a good vintage guitar sounds warm, complex, and full, not weak. High tension isn’t a reward for a “serious player.” It is a specific tool for a specific kind of modern, heavily built guitar, and using it on the wrong instrument is how bridges lift.
If you take one thing from this: inspect before you tension up, not after something sounds off. Bridge condition and seam integrity should decide your string choice long before brand loyalty or tone preference does.
— Vintage
Sources
- Nylon revolution: Segovia, Augustine, DuPont and the history of modern guitar strings
- Saitenwechsel: Klassische Gitarre – Der Gitarrenblog
- Classical guitar strings — Wikipedia