












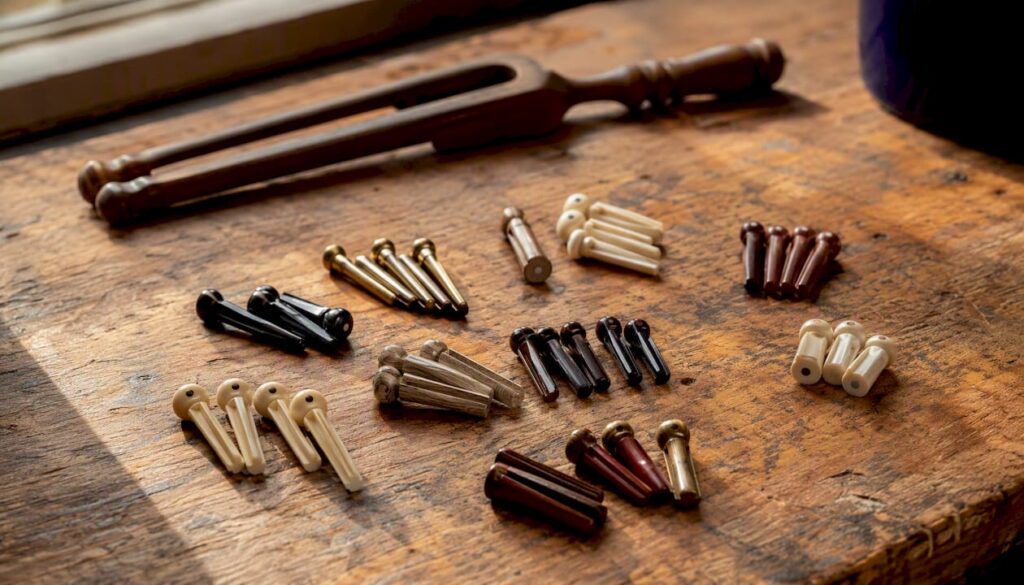

Bridge pins anchor the ball end of each string against the bridge plate, transferring string vibration into the guitar top. The main types break down by material: plastic, bone, wood (usually ebony or rosewood), brass or other metal, and synthetics like TUSQ, Micarta, or galalith.
Each material behaves differently on your guitar, but the honest short version is this: the pin’s fit matters more than its material, and the material’s effect on tone is real but usually subtle rather than transformative.
- Plastic — the factory default on most production guitars, cheap and tonally neutral.
- Bone — denser than plastic, often described as brighter with more sustain.
- Wood (ebony, rosewood) — warmer character, but sensitive to humidity swings.
- Brass or metal — heavy and bright, with the most noticeable tonal shift of the common options.
- Synthetics (TUSQ, Micarta, galalith) — engineered to mimic bone or ivory without the inconsistency of natural material.
Swap pins carelessly on a fragile vintage top, though, and you risk cracking the bridge or wearing out the bridge plate long before you notice any tonal gain.
Key Takeaways
Bridge pin fit determines instrument safety while pin material shapes tone in smaller, testable increments, and the two should never be confused.
| Point | Details |
|---|---|
| Fit before material | Confirm taper and diameter match your bridge holes before worrying about tonal character. |
| Bone and brass add brightness | Denser materials increase sustain and brightness but raise structural risk on fragile tops. |
| Test one string at a time | Swap and record a single string per session to isolate real tonal differences. |
| Never force a pin | A pin that resists gentle hand pressure signals a sizing problem, not something to push through. |
| Vintage guitars need extra caution | Match original material and consult a luthier before reaming or channel-cutting on collectible instruments. |
Table of Contents
- What Are the Different Types of Bridge Pins?
- Material-by-Material: How Each Pin Type Sounds and Wears
- How Do You Measure and Fit a Bridge Pin?
- Does Bridge Pin Material Really Change Your Tone?
- How Should You Choose the Right Bridge Pin?
- How Do You Install Bridge Pins Without Damaging the Bridge?
- What Should You Check Before Swapping Pins on a Vintage Guitar?
- Why Bridge Pin Choice Matters Beyond the Sound
- Where to Learn More About Bridge Pins and Fit
- Frequently Asked Questions
- Sources
What Are the Different Types of Bridge Pins?
Bridge pins do one job: hold the string’s ball end snug against the bridge plate so the string’s energy transfers into the top instead of leaking out as buzz or slippage. Beyond that shared function, pins vary by material, shape, and how well they’re sized to your particular bridge holes.
Guitar makers have used bone and ivory for centuries, wood pins show up on higher-end acoustic builds, and plastic became the standard once manufacturers needed a cheap, consistent option for mass production. Brass and other metals entered the picture as players started chasing more sustain and a brighter attack. Synthetic materials like TUSQ arrived more recently, engineered to replicate bone’s density without the cost or ethical baggage of natural ivory.
Understanding bridge pins starts with recognizing that they’re a system, not just a plug. The pin, the hole taper, the string’s ball end, and the bridge plate underneath all have to work together. Get one part wrong and the others compensate poorly, which is exactly how players end up with buzzing strings or a bridge plate that’s chewed up after a few years.
Material-by-Material: How Each Pin Type Sounds and Wears
Pin material affects three things that matter to a player: tonal color, weight (which relates to sustain), and how the pin holds up physically over years of string tension and restringing.
Plastic is the pin you’ll find on most guitars straight from the factory. It’s light, inexpensive, and tonally neutral, which is exactly why manufacturers default to it. It won’t hurt your sound, but it won’t do much for it either. Plastic wears down the fastest of the common materials and is the easiest to replace without any risk to the bridge.
Bone is the classic upgrade. It’s denser than plastic and tends to produce a brighter tone with noticeably more sustain, which is why it’s a favorite among players chasing more projection out of a dull-sounding acoustic. Bone pins cost more and occasionally need light fitting work, since natural bone isn’t perfectly uniform from pin to pin.
Wood pins, typically ebony or rosewood, sit at the warmer end of the tonal spectrum. Players who find brass too aggressive or bone too bright often land on wood as the middle ground. The tradeoff is that wood is more sensitive to humidity than bone or synthetic material, and a wood pin that’s shrunk slightly from a dry winter can work its way loose.
Brass and other metals are the most dramatic tonal shift you can make with a pin swap. The added mass changes how the bridge vibrates and couples to the top, and brass pins are consistently described as bright, punchy, and higher in sustain compared to lighter materials. That same mass is also the risk factor. Brass pins cannot be sanded down to fit, so precise sizing before installation matters more with brass than with any other material, and the extra weight on a fragile vintage bridge plate deserves real caution.
Synthetics like TUSQ, Micarta, and galalith are engineered to behave like bone or ivory with more consistency pin to pin. They’re a reasonable middle ground if you want bone-like brightness without the natural variation or ethical concerns around ivory-adjacent materials.
| Material | Typical tonal effect | Weight | Durability | Cost range | Backwound compatibility | Appearance |
|---|---|---|---|---|---|---|
| Plastic | Neutral, minimal change | Light | Moderate | Low | Grooved versions widely available | Plain, often black or white |
| Bone | Brighter, more sustain | Medium-dense | High | Moderate | Usually needs grooved or channel-cleared fit | Natural cream, slight grain |
| Wood | Warmer, softer attack | Medium | Moderate (humidity-sensitive) | Moderate to high | Case-by-case fit | Rich grain, ebony or rosewood tones |
| Brass/metal | Bright, punchy, high sustain | Heavy | Very high | Moderate to high | Requires precise pre-sizing | Metallic, gold or silver tone |
| Synthetic (TUSQ, etc.) | Bright, consistent | Medium-dense | High | Moderate | Grooved options common | Ivory-like, uniform |
Pro Tip: Avoid brass or dense bone as your first experiment on a pre-1970s vintage flat-top. Start with a synthetic or bone pin that matches your original diameter, and only consider metal once you’ve confirmed the bridge plate is in solid condition.
How Do You Measure and Fit a Bridge Pin?
Fit starts with understanding two shapes: the pin’s taper and whether it’s grooved or ungrooved. Most acoustic bridge pins use a standard taper that widens from tip to head, seating snugly as it’s pushed down into the hole. A small number of instruments use straight, non-tapered pins, so it’s worth confirming which style your guitar takes before ordering anything.
The groove question matters more than most players realize. Backwound strings, common on many wound acoustic sets, have windings that continue slightly past the ball end, making that section of the string marginally thicker. A pin with a groove cut along one side gives that extra material somewhere to go. Without a groove, the string channel in the bridge itself sometimes needs to be cleared to prevent the winding from pinching against the pin.
Here’s how to measure and check fit without guessing:
- Measure the pin’s widest diameter near the head using calipers, not a ruler.
- Measure the hole’s diameter at the top of the bridge, where the taper is widest.
- Check the taper angle by comparing how far the pin sits proud when hand-pressed into the hole without a string.
- Inspect for a groove or channel on your current pins and note whether your string set is backwound.
- Test seating depth by stringing up one hole first and confirming the pin sits flush, not proud, once the string is under tension.
A basic tools checklist covers calipers or a pin gauge set, a soft cloth to protect the top while you work, and a flashlight to inspect the bridge plate through the sound hole. Bone and wood pins can be lightly sanded for a custom fit, but brass cannot, so any metal pin needs to be correctly sized before it ever goes near the hole.
Does Bridge Pin Material Really Change Your Tone?
Yes, but modestly, and the effect depends heavily on the instrument. Bridge pins anchor string energy into the top through the bridge plate, and correct seating is what preserves clarity and volume in the first place. Material comes second to fit, not the other way around.
The mechanism is straightforward physics: contact area, pin density, and how much mass sits at the bridge all influence how efficiently vibration transfers into the top. A heavier pin like brass changes the mass loading at that anchor point, and that shift shows up as a brighter, more sustained sound on many guitars. A lighter or softer pin, like plastic, does less to alter what the top and bridge plate were already doing on their own.
Don’t expect night-and-day results, though. Changing bridge pins is genuinely one of the lowest-effort ways to nudge an acoustic’s tone, but it’s a nudge, not a rebuild. If you’re hoping a $15 pin set will fix a guitar that sounds thin or dead, the problem is more likely the top, the strings, or the setup.
Test changes properly rather than swapping all six pins at once and trusting your memory. Change one string’s pin at a time and record a close-mic A/B comparison in the same room, same amp settings, same playing pattern. Swapping everything simultaneously makes it impossible to isolate what you’re actually hearing.
Pro Tip: Record a simple fingerpicked pattern before and after each pin swap using your phone. Listening back later, away from the guitar, reveals differences your ears miss in the moment because you’re anticipating a change.
How Should You Choose the Right Bridge Pin?
Start with three questions: is the guitar vintage or structurally fragile, are you chasing a specific tonal change, and do you play strings with backwound windings? Your answers point toward either a conservative match or room to experiment.
If you’re working with an older or collectible instrument, match the original material and diameter as closely as possible rather than treating the pin swap as an experiment. Plastic or a well-matched synthetic carries the least risk. If you’re on a modern, structurally sound guitar and you’re specifically chasing brightness or extra sustain, brass or dense bone gives you the most noticeable shift, with the understanding that brass needs precise sizing before it ever touches the hole.
Before buying anything, run a few non-destructive checks: measure your current pin’s taper and diameter, confirm the ball end is seating fully against the bridge plate (not riding high in the hole), and change one string at a time so you can hear what’s actually different. If a pin doesn’t slide in with light hand pressure, that’s your signal to stop.
Forcing a bridge pin that doesn’t fit can crack the bridge outright, and that risk climbs sharply with denser materials like brass or bone on instruments that have already aged for decades.
When in doubt, a luthier can check taper compatibility in minutes, which is far cheaper than repairing a cracked bridge later.
How Do You Install Bridge Pins Without Damaging the Bridge?
Fit matters as much as material, full stop. A pin that’s slightly too large for its hole, forced into place with the string already under tension, is how bridge plates wear out and bridges crack or lift over time.
Here’s a safe restringing sequence when installing new pins:
- Loosen and remove the old string completely before touching the pin.
- Insert the new string’s ball end into the hole first, feeding it in a few inches.
- Seat the pin by hand pressure only, groove facing toward the string channel if your pins are grooved.
- Pull the string gently upward while pressing the pin down, so the ball seats fully against the bridge plate rather than against the pin itself.
- Tension the string and tug-test it once it’s roughly in tune. A firm, gentle tug confirms the ball is properly seated instead of caught on the pin.
- Check that the pin sits flush, not raised above the bridge surface, once the string is at pitch.
If you’re dealing with backwound strings and ungrooved pins, some players clear a small channel in the wood to give the thicker winding section room. This is delicate work.
The channel must be cut carefully. Overdoing it can damage the bridge plate and lead to cracked or lifted bridges, which is far more expensive to repair than the pin swap was meant to save.
Watch for these warning signs that mean it’s time to stop and call a luthier rather than continuing on your own:
- Pins that sit noticeably proud even after firm hand pressure.
- Strings that slip or buzz despite a proper tug test.
- Visible wear, splintering, or discoloration around the bridge plate through the sound hole.
- A pin hole that feels loose or oversized compared to a new pin of the correct diameter.
Our guide on why guitars use different bridge types covers how bridge plate condition interacts with string tension over the life of an instrument, which is worth reading before you attempt any pin work on an older guitar.
What Should You Check Before Swapping Pins on a Vintage Guitar?
Vintage Guitar World’s approach to any pin swap on a collectible instrument starts with the bridge plate, not the pins themselves. A worn or thinning bridge plate changes everything about which materials are safe to use and whether pin work should happen at all.
Our inspection checklist for pin-related work on older instruments covers four areas: bridge plate integrity (checked with a flashlight through the sound hole for cratering or thinning around the pin holes), whether the current pins are original to the instrument, any evidence of prior reaming or oversized holes from past repairs, and the guitar’s humidity history, since wood movement over decades changes how snugly original pins still fit.
Preservation and tonal curiosity don’t have to conflict, but they call for different decisions. If the original pins are intact, correctly seated, and the bridge plate shows no wear, we generally recommend leaving them alone on instruments with real collector value. Original components, pins included, factor into how a vintage guitar is valued. Swapping to a heavier or exotic material for tonal experimentation is a reasonable choice on a player’s guitar, but it’s worth documenting on anything you might resell or have appraised later, since undocumented modifications can complicate a valuation.
On instruments we restore, we treat the bridge plate as the single most important structural check before any pin material decision gets made. Everything else about tone is secondary to whether the plate can safely carry the string load in the first place.
Pro Tip: If you’re unsure whether your pins are original, check for slight variation in shape or wear pattern between pins. Factory sets are usually uniform. Mismatched pins often mean a prior repair or replacement you should factor into any valuation.
Anyone considering a full restoration rather than a simple pin swap should look at our acoustic guitar restoration guide for collectors before making structural changes.
Why Bridge Pin Choice Matters Beyond the Sound
We think about bridge pins the way we think about most small components on a vintage instrument: they’re reversible, they’re informative, and they’re also the first place careless hands do damage that outlasts the tonal experiment that caused it. A pin swap satisfies real curiosity about tone cheaply, and that’s worth encouraging. But curiosity and conservation aren’t opposites here. They just require sequencing. Check the bridge plate first, measure before you buy, and change one string at a time before committing to a full set.
Players chasing tone should experiment freely on modern, structurally sound guitars. Owners of anything genuinely old or rare should treat a luthier consultation as part of the process, not a fallback for when something goes wrong. If you’re weighing whether an instrument in your collection is a candidate for careful restoration or pin work, browsing vintage guitars by type, history, and investment potential is a useful starting point before you touch anything with a screwdriver.
Where to Learn More About Bridge Pins and Fit
A few sources are worth bookmarking if you want to go deeper on measurement, materials, or safe fitting practices before you start swapping pins yourself.
- Bridgepins and So On covers groove and channel-clearing detail in more technical depth than most retail guides.
- Premier Guitar’s piece on bridge pin fit is a solid read on the structural risks of forcing an ill-fitting pin.
- Guitar Anatomy’s material and tone breakdown goes into more detail on sanding and sizing bone versus brass.
- Crosby Audio’s analysis of brass pin tone explains the mass-loading mechanism behind brass’s brighter sound.
- A basic pin gauge set and a good set of calipers cover nearly every measurement task described above.
- For anything involving an older or collectible instrument, our guitar appraisal checklist and guitar testing appointments are the safest starting points before any modification.
Frequently Asked Questions
Do bridge pins really change your tone?
Yes, though modestly. Denser materials like brass or bone tend to brighten tone and add sustain by changing how much mass sits at the bridge, while plastic stays closer to neutral.
What’s the difference between grooved and ungrooved bridge pins?
A groove gives extra room for the slightly thicker winding on backwound strings near the ball end, preventing the string from pinching against the pin as it seats.
Can I install bridge pins myself, or do I need a luthier?
Standard restringing with correctly sized pins is a reasonable DIY task. Any reaming, channel clearing, or hole widening on a vintage instrument is best left to a luthier, since mistakes can crack or lift the bridge.
Are brass bridge pins safe for a vintage guitar?
Brass adds noticeable weight and brightness, but that extra mass can stress an aged bridge plate over years of tension. Confirm plate condition with a professional before choosing brass on anything genuinely old.
How do I know if my bridge pins fit correctly?
A properly fitted pin seats flush with light hand pressure, holds the string ball firmly against the bridge plate, and passes a gentle tug test without slipping.
This article provides general information about acoustic guitar bridge pins and is not a substitute for hands-on evaluation by a qualified luthier, particularly for vintage or structurally compromised instruments.
Sources
- bridgepins and so on
- Time for new bridge pins? | Premier Guitar
- Bridge Pin Selection: Material & Tone | Guitar Anatomy
- The Impact of Bridge Pin Materials on Guitar Tone – Crosby